
How to Use Goal Seek in Excel a Step-by-Step Guide and Video
.png)
Follow these 5 easy steps and examples to learn quickly how to use Goal Seek in Excel. Goal Seek is one of Excel's most practical and underused features. It solves a problem that comes up constantly in financial modeling, business planning, and data analysis: you know the answer you need, but you have to work backwards to find the input that gets you there.
Instead of manually adjusting a number over and over until your formula produces the result you want, Goal Seek does it automatically. You tell it what result you want and which cell to change, and Excel finds the answer in seconds.
This guide covers what Goal Seek does, when to use it, and exactly how to run it with clear step by step instructions and practical examples you can apply immediately.
What Is Goal Seek in Excel?
Goal Seek is a what-if analysis tool built directly into Excel. It works by reversing the normal direction of a formula calculation.
Normally you enter inputs and a formula produces an output. Goal Seek flips that process. You specify the output you want and tell Excel which input to adjust, and Goal Seek changes that input iteratively until your formula produces the target result.
A simple example: You have a loan payment formula that calculates your monthly payment based on the loan amount, number of payments, and interest rate. Normally you enter an interest rate and see what payment comes out. With Goal Seek you say "I want my monthly payment to be exactly $1,500. What interest rate makes that happen?" and Excel finds the answer automatically.
Watch how to use Goal Seek in this video
https://youtube.com/shorts/P-wvInT5WDs
When Should You Use Goal Seek?
Goal Seek is the right tool any time you know the result you need and want to find the single input value that produces it.
Break-even analysis: You want to know exactly how many units you need to sell before your revenue covers your costs. Goal Seek finds that number precisely without trial and error.
Loan and interest calculations: You know what monthly payment you can afford. Goal Seek tells you the interest rate, loan amount, or number of payments that keeps you within your limit.
Sales and revenue targets: You need to hit a specific revenue number this quarter. Goal Seek tells you how many units to sell or what price to charge to get there.
Savings goals: You want to save a specific amount by a specific date. Goal Seek tells you exactly how much to set aside each month.
Profit margin targets: You have a target margin in mind. Goal Seek tells you what price to charge or what cost to hit given your current cost structure.
The one requirement is that your problem involves one unknown input and one target output connected by a formula. If you need to adjust multiple variables at the same time, use Excel's Solver add-in instead, which handles multi-variable optimization.
Where to Find Goal Seek in Excel
Goal Seek is built into every version of Excel and does not require any installation or add-ons.
To access it:
1. Click the Data tab on the Excel ribbon.
2. Find the Forecast group on the ribbon.
3. Click What-If Analysis.
4. Select Goal Seek from the dropdown menu.
If you do not see the What-If Analysis button, your ribbon may be customized or you may be on an older version of Excel. In older versions, look under the Tools menu for Goal Seek.
Step 1: Set Up Your Spreadsheet
Before you open Goal Seek, your spreadsheet needs to be set up correctly. Goal Seek requires three things to already exist in your workbook:
- A cell containing the input value you want Excel to adjust
- A cell containing a formula that uses that input and calculates a result
- A specific target value you want the formula to reach
Example setup for a loan payment calculation:
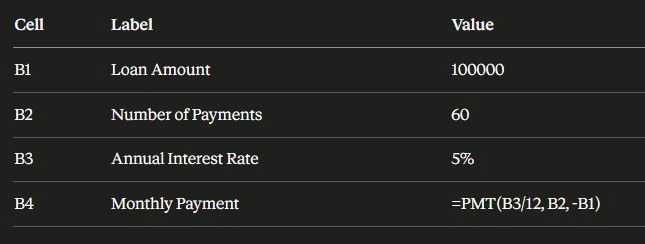
In this setup:
- B3 is the input cell, the interest rate that Goal Seek will adjust
- B4 is the formula cell, the monthly payment calculated by the PMT function
- Your target is the specific monthly payment you want to achieve, for example $1,500
The formula in B4 is =PMT(B3/12, B2, -B1). This calculates the monthly payment using the annual interest rate divided by 12 to get the monthly rate, the total number of payments, and the loan amount entered as a negative number.
The starting value in B3 does not need to be your final answer. It is just an initial estimate for Goal Seek to begin calculating from. A reasonable starting estimate that is close to the expected answer helps Goal Seek find the solution faster.
Step 2: Open Goal Seek
1. Click the Data tab on the ribbon.
2. Click What-If Analysis in the Forecast group.
3. Click Goal Seek from the dropdown.
The Goal Seek dialog box opens. It contains three fields that you need to fill in.
Step 3: Configure Your Goal Seek Settings
The Goal Seek dialog has three fields. Each one must be filled in correctly for Goal Seek to work.
Set Cell
This is the cell containing your formula, the one whose result you want to reach a specific value. In the loan example this is B4, the cell with the PMT formula that calculates the monthly payment.
Click inside the Set Cell field in the dialog box, then click cell B4 in your spreadsheet. The reference B4 will appear in the field automatically.
To Value
This is the target result you want the formula to produce. In the loan example, if you want a monthly payment of $1,500, type 1500 here.
Type the number only. Do not include dollar signs, commas, or percentage symbols.
By Changing Cell
This is the input cell you want Goal Seek to adjust in order to reach your target. In the loan example this is B3, the interest rate.
Click inside the By Changing Cell field, then click cell B3 in your spreadsheet. The reference B3 will appear automatically.
Your completed Goal Seek configuration:

Before clicking OK, double check all three fields. The most common mistake is entering the same cell in both Set Cell and By Changing Cell, which causes Goal Seek to fail. Set Cell must always be the formula cell. By Changing Cell must always be an input cell that the formula depends on.
Step 4: Run Goal Seek
1. Click OK in the Goal Seek dialog box.
2. Excel begins adjusting the value in B3, recalculating the PMT formula after each adjustment, until it finds the interest rate that produces a monthly payment of $1,500.
3. When Goal Seek finds a solution, the Goal Seek Status dialog appears telling you that a solution was found.
4. You have two choices at this point:
- Click OK to accept the solution. Excel keeps the new value in B3 and the updated result in B4.
- Click Cancel to reject the solution. Excel restores your original values as if Goal Seek was never run.
Step 5: Review Your Result
After clicking OK, look at cell B3. It now contains the interest rate required to produce a monthly payment of $1,500 on a $100,000 loan over 60 months.
Check cell B4 as well. It should show a value very close to $1,500. Goal Seek uses an iterative process and may produce a result that is extremely close but not exactly equal to your target due to rounding, for example $1,499.98 instead of $1,500. This is normal and the answer is accurate for all practical purposes.
If Goal Seek says it could not find a solution:
This usually means one of three things. The target value you entered is mathematically impossible given your formula. The starting value in your By Changing Cell was too far from the actual answer for Goal Seek to converge. Or there is an error in your formula preventing it from calculating. Try changing your starting value in B3 to something closer to what you expect and run Goal Seek again.
Practical Examples of Goal Seek in Excel
Example 1: Monthly Savings Goal
The scenario: You want to save $30,000 in 36 months. Your savings account earns 2% annual interest. How much do you need to save each month?
Setup:
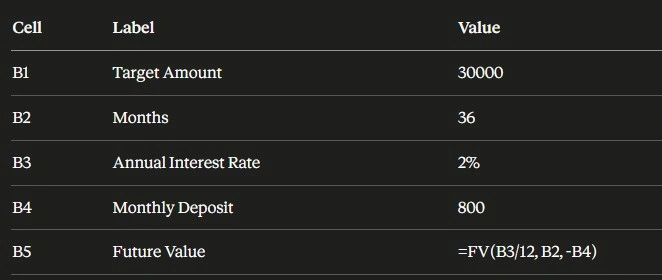
Goal Seek configuration:
- Set Cell: B5
- To Value: 30000
- By Changing Cell: B4
Goal Seek adjusts B4 until the future value in B5 reaches $30,000 and tells you exactly how much to deposit each month.
Example 2: Break-Even Sales Volume
The scenario: Your fixed costs are $12,000 per month. Each unit you sell generates $30 in gross profit. How many units do you need to sell to break even?
Setup:
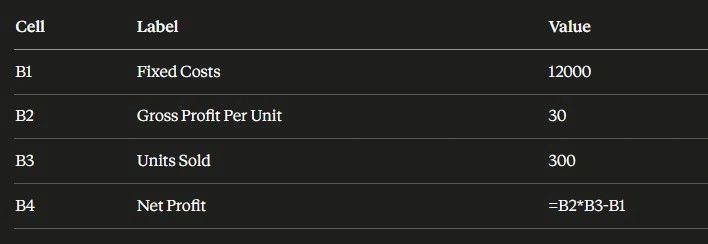
Goal Seek configuration:
- Set Cell: B4
- To Value: 0
- By Changing Cell: B3
Goal Seek returns 400 units as the exact break-even point.
Example 3: Required Selling Price
The scenario: You need to generate $75,000 in revenue this month. You expect to sell 500 units. What price do you need to charge?
Setup:
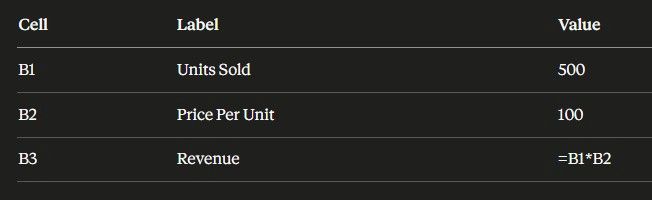
Goal Seek configuration:
- Set Cell: B3
- To Value: 0.4
- By Changing Cell: B2
Goal Seek returns $75 as the selling price needed to achieve a 40% margin.
Tips for Getting the Best Results From Goal Seek
Start with a reasonable estimate. The value in your By Changing Cell before you run Goal Seek is the starting point for the iterative calculation. Starting closer to the expected answer helps Goal Seek find the solution faster and reduces the chance of it converging on the wrong answer if multiple solutions exist.
One variable at a time. Goal Seek can only adjust one input cell per run. If your problem requires changing two or more variables simultaneously to reach a target, use Excel's Solver add-in which is available under Data, Solver and handles multi-variable optimization with constraints.
Make sure your formula works before running Goal Seek. If your formula contains an error or does not calculate correctly with your starting values, Goal Seek will fail. Test the formula manually first to confirm it is producing reasonable results.
Confirm the target is mathematically possible. Goal Seek cannot find a solution that does not exist. If you set a monthly payment target lower than the interest alone on a loan, no interest rate can produce that result. If Goal Seek consistently fails to find a solution, reconsider whether the target is achievable given your formula's constraints.
Keep your original values. Goal Seek overwrites the value in your By Changing Cell when it finds a solution. If you want to preserve your original inputs, write them down or copy them to a separate cell before running Goal Seek. If you click Cancel after Goal Seek runs, your original values are restored automatically.
Goal Seek vs Solver: Which One Do You Need?
Use Goal Seek when you have one formula, one target value, and one variable to change. It is fast, simple, and built in with no setup required.
Use Solver when you need to optimize a result by adjusting multiple input variables at once, when you need to set minimum or maximum constraints on those variables, or when you want to minimize or maximize a value rather than hit a specific target. Solver is available under the Data tab and may need to be enabled as an add-in through File, Options, Add-ins if it does not appear by default.
For the large majority of everyday what-if analysis in Excel, Goal Seek is all you need.
Frequently Asked Questions
Where is Goal Seek in Excel?
Goal Seek is in the Data tab on the Excel ribbon. Click Data, then click What-If Analysis in the Forecast group, then select Goal Seek from the dropdown menu. It is built into all versions of Excel and does not require any add-ins or installation.
What does Goal Seek do in Excel?
Goal Seek finds the input value needed to make a formula produce a specific result. You tell it which cell contains your formula, what result you want that formula to produce, and which input cell to adjust. Excel then changes that input iteratively until the formula reaches your target value.
Why is Goal Seek not working in Excel?
The most common reasons Goal Seek fails are that the target value is mathematically impossible given your formula, the starting value in the By Changing Cell is too far from the actual answer, or there is an error in your formula. Try adjusting your starting value to something closer to the expected answer and verify that your formula calculates correctly before running Goal Seek.
What is the difference between Goal Seek and Solver in Excel?
Goal Seek adjusts one variable to reach one specific target value. Solver can adjust multiple variables simultaneously, apply constraints to limit the range of those variables, and find minimum or maximum values rather than specific targets. Use Goal Seek for simple single-variable problems. Use Solver for complex optimization that involves multiple inputs or constraints.
Can Goal Seek work with any Excel formula?
Goal Seek works with any formula where changing the input cell produces a corresponding change in the result. It works best with continuous smooth functions. It may struggle with formulas that produce the same output across a wide range of inputs or that contain IF statements and other logical functions that create sudden jumps in the output value.
Does Goal Seek change the original data?
Yes. When you click OK to accept a Goal Seek result, it overwrites the value in your By Changing Cell with the solution it found. If you click Cancel instead, your original values are restored. To protect your original data, copy the By Changing Cell value to another location before running Goal Seek.
What is the maximum number of iterations Goal Seek uses?
By default Excel runs up to 100 iterations and stops when it reaches a result within 0.001 of your target. You can change these settings by going to File, Options, Formulas, and adjusting the Maximum Iterations and Maximum Change values under Calculation options. Increasing iterations may help Goal Seek find solutions for more complex formulas.
Is Goal Seek available in all versions of Excel?
Yes. Goal Seek is available in all modern versions of Excel including Excel 2010, 2013, 2016, 2019, 2021, and Microsoft 365. The location is the same in all versions: Data tab, What-If Analysis, Goal Seek.
Learn Excel with me here or read more related articles.
Learn more about Excel here
How to make a project progress dashboard in Excel
All Excel formatting options explained
10 Tips for Creating Dashboards in Excel and Google Sheets
10 Excel Functions Every User Should Know