
How to Create an Excel Company Cash Flow Planner with Download
.png)
Effective cash flow management is critical for the success of any business. A well-structured cash flow planner helps you monitor incoming and outgoing cash, ensuring that your company remains financially healthy. Excel provides a powerful yet simple tool for creating a cash flow planner tailored to your needs. Here's a step-by-step guide to building one from scratch.
Step 1: Define the Purpose of Your Cash Flow Planner
Before diving into Excel, clarify your objectives. Your cash flow planner should:
- Track monthly cash inflows (e.g., sales, loans, investments).
- Track monthly cash outflows (e.g., payroll, rent, utilities, debt payments).
- Highlight net cash flow (difference between inflows and outflows).
- Provide insights into future financial positions to aid decision-making.
Step 2: Set Up the Structure in Excel
Open a New Workbook: Open Excel and create a new worksheet. Name the tab "Cash Flow Planner."
Create Headings: In row 1, create the following headings:
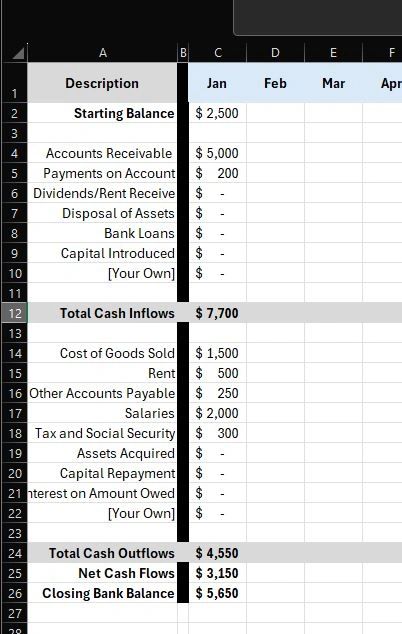
- Column A: Description (e.g., Income or Expense category)
- Cell A2: Starting Balance
- Columns C to N: Monthly columns (January to December)
- Column O: Total (Year-to-Date)
Add Sections:
In Column A, group similar categories into "Cash Inflows" and "Cash Outflows."
Common items to include in cash inflows are:
1. Accounts Receivable: Money received from payment of client invoices.
2. Payments on Account: Client money you receive into the business during the month, generally services not yet done.
3. Dividends/Rent Receivable: Non client money like interest or investment income.
4. Disposal of Assets: Money received for selling assets like business vehicles or equipment.
5. Bank Loans: Any new funding from a lender.
6. Capital Introduced: If an owner added in money, it goes here.
Common items to include in cash outflows are:
1. Cost of Goods Sold or COGS: Inventory costs, raw materials, shipping, 3rd party costs, labor, but if you put labor here don't put it in salary.
2. Rent: Costs of facility.
3. Other Accounts Payable: Any other cost not anywhere else.
4. Salaries: Base compensation and overtime, PTO, vacation, sick, etc.
5. Tax and Social Security: Employer portion of payroll costs
6. Assets Acquired: Costs of assets like business vehicles.
7. Capital Repayment: Payments made to lenders or owners that are not payroll costs
8. Interest on Amount Owed: Interest paid on loans.
Leave blank rows between inflows and outflows for clarity.
Insert Summary Rows:
- Below the "Cash Inflows" section, in A12 add a row for Total Cash Inflows.
- Below the "Cash Outflows" section, in A24 add rows for Total Cash Outflows and Net Cash Flow (Inflows - Outflows).
Step 3: Input Formulas into Your Excel Cash Flow Planner
- Starting Balance Formula:
- In Cell C2, enter your initial cash balance manually.
- Monthly Totals:
- For cash inflows, sum the values for each month. Example:
- In Cell C12 (Total Cash Inflows for January), use:
=SUM(C2:C11) - Repeat this for each month and for cash outflows.
- Net Cash Flow Formula:
- In Cell C25 (Net Cash Flow for January), subtract total outflows from total inflows:
=C12-C24 - Copy this formula across all monthly columns.
- Year-to-Date Totals:
- In the "Total" column (Column O), calculate cumulative totals for each row. Example:
=SUM(C12:N12) and =SUM(C24:N24) and =SUM(C25:N25) and =SUM(C26:N26)
Step 4: Format Your Planner
- Add Borders: Highlight the table and add borders for clear separation.
- Apply Currency Formatting: Select all numeric cells and format them as currency for consistency.
- Use Conditional Formatting: Highlight negative net cash flow values in red to quickly identify potential issues. Highlight the row, then go to Home then Conditional Formatting and choose Highlight Cells Less Than and enter 0.
- Freeze Panes: Freeze the top row and first column for easy navigation.
Step 5: Test and Adjust
- Enter Sample Data: Populate the planner with example inflow and outflow figures to ensure formulas work correctly.
- Analyze Results: Review the net cash flow to identify trends or concerns.
- Adjust Categories: Tailor the planner by adding or removing categories based on your company’s needs.
Step 6: Save and Share
- Save your cash flow planner as a template for future use.
- Share it with team members or financial advisors to keep everyone aligned on the company’s financial health
Get the template in my free downloads section.